Line scan camera basics
There are a large number of reasons for the use of line scan cameras:
- As a seamless recording method it is perfectly suitable to check longer objects and continuous materials. Long PCBs, flat panels or electronic components, or materials like glass, wood, cloth or steel can be inspected without interruption with high resolution (web inspection). Surface error inspections and print image inspections are typical applications. But line scan cameras are also used in document and film scanning as well as to sort post (OCR, code reading).
- For the inspection of round bodies without perspective distortion. However, the part must be rotated for this purpose. A 360-degree surface or print image inspection can be achieved in this way.
- The cost-benefit ratio, too, is indicative of the use of line scan cameras, particularly if high resolutions are required. The resolution ranges up to 16384 pixels in X-direction, in the transport direction the resolution is (almost) random.
Area scan camera
Line scan camera
Image acquisition of line scan cameras
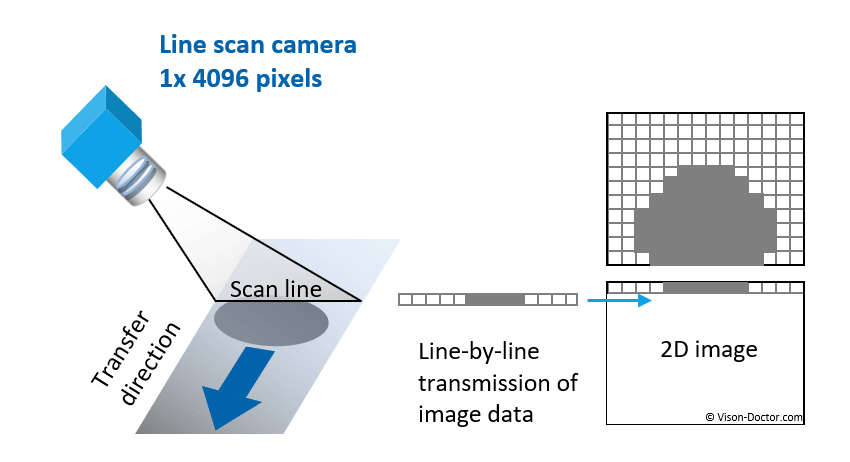
The camera only captures one image line in fast succession. For two-dimensional image acquisition, motion is required in addition to the inspection: either the object to be captured is moved by means of a conveyor ("fax principle") or the camera is moved along the stationary object ("scanner principle").
|
As the image in Y-direction is generated due to the movement of the conveyor, it is important that this is an extremely uniform motion. However, this is technically hard to realise so that the feed is synchronised by means of an encoder in order to avoid image distortions.
If there are individual objects on a conveyor, the image acquisition can additionally be triggered: a photoelectric barrier sends a signal to the image capture hardware. Only then the lines are transmitted and it is possible to avoid that the test object spreads over two image blocks.
The line scan sensor
Typical sensor resolutions of 512, 1k, 2k, 4k, 8k, and 12k are available for the image acquisition. The pixel sizes on the sensor range from 5 x 5 µm, 7 x 7 µm, 10 x 10 µm to 14 x 14 µm. If possible, the camera should have preferably large pixels. A 5-µm pixel has a light-active surface of 25 µm2, yet a 14-mm pixel has 196 mm2, i.e. approximately 8 times the surface and 8 times the sensitivity to light. As the image capture time of the single lines can often only be several µs, the sensitivity to light is especially important for line scan cameras.
From a resolution of 2048 pixels on, the sensor with 14-µm pixels has a line length of approximately 29 millimetres: the C-mount typical for industrial area scan cameras cannot be used. From a line length of over 20 mm on, the cameras have a M42 connection or Nikon bayonet, also called F-mount connection.
In case of line lengths of 8k or 12k resolution, increasingly small pixel sizes are used, e.g. 7 µm, as the sensor could otherwise not be exposed using lenses with M42 or F-mount connection. The next larger standard would be optics for medium format cameras which are extremely expensive.
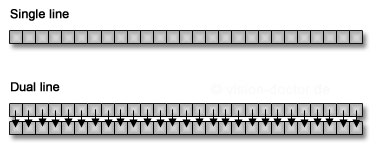
In order to enhance the sensitivity to light, sensors with two or more lines are used instead of those with one line, which can vertically pool the signal of several lines without losing any physical resolution like in the case of horizontal binning.
 |
In an extreme case, so-called TDI line scan cameras (time delay integration) serve to add up to 96 lines to one overall signal in order to be 96 times more sensitive. As in this special case the large number of lines is also spatially spread, the image capture on the sensor must be synchronised very accurately with the movement of conveyor and test object in order to make both displacements (conveyor and sensor) match precisely. Only in this way the lines can subsequently be summed up without generating image blurring.
Image readout
The line scan sensor is read out in fast succession: a line scan camera with a sampling rate of 18 kHz, for instance, reads out 18,000 times per seconds, i.e. every 55 µs. In order to get the data out of the sensor, the digitalisation must happen very fast: in case of a line length of 2048 pixels, this is a frequency of 18 kHz x 2048 = 36 MHz. In order to be able to read out the sensor with even higher data rates, the sensor is read out on multiple channels:
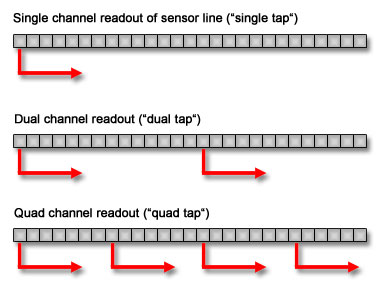 |
In practice, up to 8 sensor "taps" are operated in order to read out the sensor of a 12-megapixel line scan camera, for example, using a data rate of up to 320 MHz.
Image transmission
The CameraLink interface prevails in the image transmission for line scan cameras and has thus completely replaced the old LVDS interface. This standard serves to transmit up to 800 megabytes per second. For this purpose a CameraLink image acquisition card is required at which maximally one camera can be operated in "full configuration" or two cameras in "base configuration", depending on the data rate. It is important that the image acquisition card is adapted for the requirements of the line scan camera (bit depth, number of sensor taps, etc.). The cables are standardised, however, some important details must be observed, too, like the screwing or locking of the plugs or simply the quality of the signal lines. Cable lengths of up to 10 metres are possible without any problems using CameraLink cables, in case of longer cables repeaters or fibreglass converters must be used.
As a new, second transmission medium for bandwidths of up to 80 megabytes per second, line scan cameras with a gigabit Ethernet interface are available, too. The advantages are the omission of the image acquisition card and the long cables which can also be achieved using cheap Ethernet network cables. The overall system is therefore clearly cheaper.
A peculiarity and novelty are intelligent line scan cameras. They work mainly at a line scan frequency of 12 to 18 kHz with a resolution of 1 to 2k line length. The image must no longer compulsively be transmitted to a PC, as it is immediately evaluated in the device and only the measurement results are transferred via the FastEthernet interface (100 Mbit) and I/Os. Handling these devices is also possible for less ambitious image processors, as the complexity is not that high and the modularity of the components (and number of error sources) is extremely restricted. This technology, however, has clear limits concerning camera resolution and software evaluation, as the computing power is significantly lower compared to a PC.
Image evaluation in the software
What exactly is supposed to be transmitted and then evaluated?
Scanning fixed image blocks:
The machine vision system is configured in such a way that always a defined number of lines are scanned. In this way, even very long image strips, e.g. with 10,000 lines, can be transmitted. Yet this very simple method does have disadvantages, too: during the transmission of the image block, this cannot be processed.
A variation of this method is to equip the system with an image trigger in order to detect single parts on a conveyor, for example. The image capture of the individual lines only starts when a photoelectric barrier is triggered by a part. This makes it possible to avoid that a part is accidentally spread over two image blocks.
Scanning continuous small image regions:
The transmission of smaller image blocks is also interesting. Small segments are transmitted immediately and put together in the PC. In this way the user is provided with image information at a faster pace, which can be processed. Particularly in case of continuous material which is supposed to be check completely, the processor is better working to capacity in this way. If any features (such as paint defects and scratches) are accidentally in the overlapping zone, it can be complicated to evaluate them because the information is spread over two images. However, the programmer can take this into consideration when developing the application and dynamically shift the image regions.


