Precision and repeatability of a machine vision system
The accuracy of the machine vision system results from the sum of all individual errors of all components and the interfering influences of the plant into which the system has been integrated. Particularly sensitive are applications which are supposed to provide precise measurements. The fluctuating environmental conditions such as extraneous light must be considered, too. It is rather unlikely that errors neutralize each other, normally they add up to an overall error.
Typical causes of inaccuracy
- Plant vibrations can lead to blurring or camera offsets
- Inaccurate supply of parts in the X & Y position, but also varying working distances to the camera can lead to perspectival errors and scale changes.
- Contaminants such as dust or oil can considerably influence the measurement. Dirt on the illumination or test object causes faulty edge detection.
- The quality of the lens, especially in case of imprecise alignment of the part in translational direction leads to perspective effects. A telecentric measuring lens can provide a remedy.
- Accurate, reproducible alignment of the camera was not done.
- Accuracy of the software tools used: depending on the algorithm used different errors are possible, these could be 1 - 2 pixels in case of binary algorithms and 1/10 pixels for edge detection and gradient-based object search.
- Inaccuracies of the calibration methods can also slip into the result: not accurately printed and poorly positioned calibration targets also impair the quality.
In the laboratory arrangement and using a lot of practical experience, the error can be estimated fairly well, but a final measurement accuracy may only be determined in plant operation. For this purpose a larger number of parts must be examined and counter-checked. The repeatability of a measurement can be proven on a component that is, for example, sent through the plant 50 times and measured in order to investigate the variation of the results.
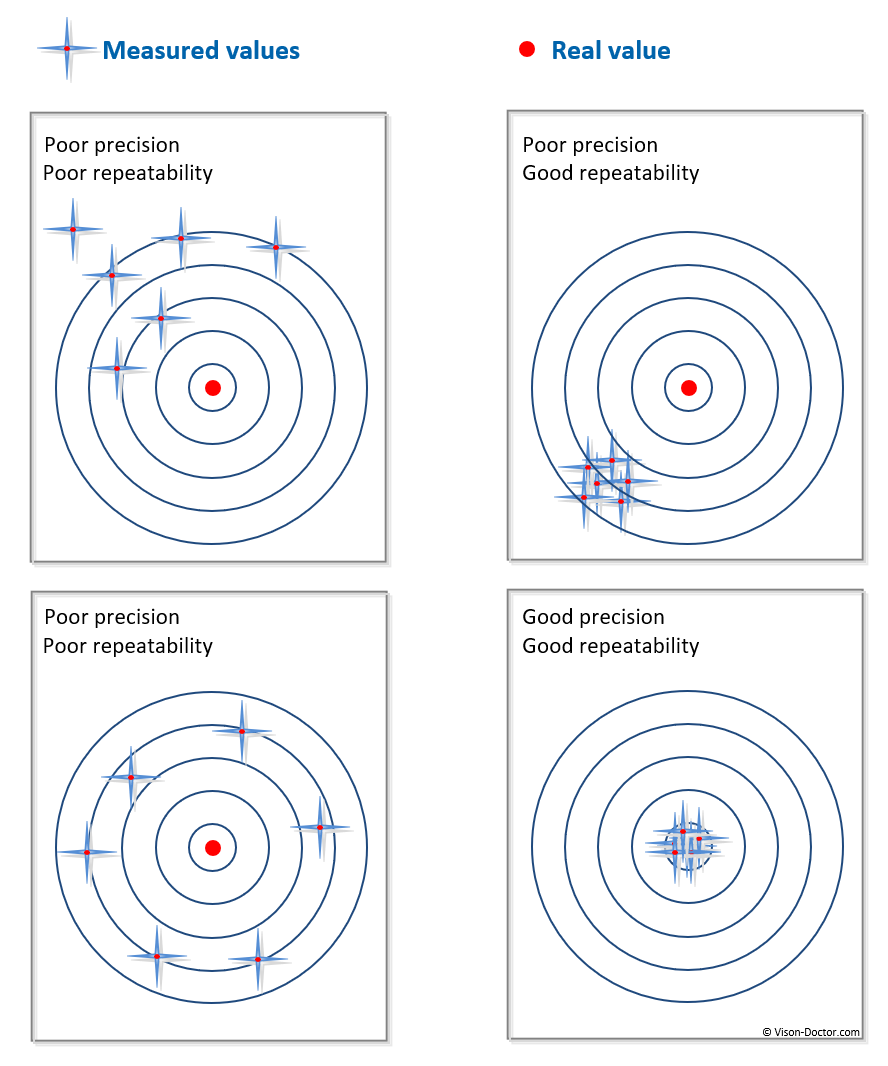
Spread of results: Precision and repeatability
 |
The repeatability of the results indicates how close the individual measuring results are. The variance is very low in this case: it is calculated by squaring the distances of the measured values from an average value, adding them and dividing them by the number of measured values. The variance, however, has a unit different from the results. In order to correct this blemish, the results are also expressed as standard deviation. The standard deviation is the square root of the variance. The following modified formula can also be used for systems which continuously capture large quantities of measuring values.
The precision and repeatability in the plant can be proven by means of a "golden sample", when the same component with known dimensions is sent through the inspection cell several times. If you can only record the measurement values, only the repeatability can be determined. The assumption that a high repeatability stands for the correctness of the results is flat wrong. The (re)calibration of the machine vision system is also mandatory to determine the true value of the component and transmit it to the machine vision system.
The repeatability and precision of the results is strongly determined by the camera image with good contrast and the quality of the software. In case of edge detection and gradient-based object search it is possible to achieve sub-pixel precision: The system internally calculates many decimal places, but how accurate the interpolation of the grey shades by means of the evaluation software eventually is becomes apparent in the overall process with all parameters and interfering influences.
Optimisation of the accuracy of image processing systems
- Use cameras with sufficient resolution and a sensor with low noise and large pixel structures. For measurements please normally use monochrome cameras because they are more sensitive and have no Bayer interpolation compared to a single-chip colour camera and therefore not the associated effective reduction in resolution. CCD sensors are (so far) superior to CMOS sensor because of their sensitivity and have a higher fill factor. Their linear output characteristic is more suitable for measurement applications.
- Do not set the camera gain to an excessive value, as the noise will be amplified, too. The image should not be overexposed (saturated pixels), since this will overframe the grey values of neighbouring pixels. This effect will destroy pixel information directly before the camera electronics can read it!
- Design a robust, precise and reliable system structure. Decouple vibrations, prevent stray light using light-shielding or appropriate optical filters.
- If possible, use telecentric measuring lenses, which have no image perspective due to a parallel beam path and the same imaging scale within the "telecentric range" (in Z-direction). When using normal lenses please select lenses with longer focal lengths and lowest possible distortion. Especially when using high-resolution cameras with small sensor pixels, the optics should have a high optical resolution.
- The illumination should be sufficiently strong so that extraneous light does not matter (but the image is not overframed!). Extraneous light shielding can be further optimised using coloured lighting and appropriate filters. LED flash controllers are able to strobe (overdrive) LED lights for a short time. When measuring, a background lighting should emit collimated light (with low stray light), if possible, in order to achieve sharp shadow contours. Ideally, your backlight is also "telecentric".
- Software algorithms should have a high computational accuracy. Binarising tools must be prevented, gradient-based measuring tools but also edge-based object search tools are suitable for sub-pixel measurements (according to the quality to a greater or lesser extent). Lens distortion can be mathematically removed by non-linear image transformations and can further optimise the result. In an extreme case, the same part can be measured several times and used to generate an idealised value using statistical methods.


