Calibration of line scan cameras
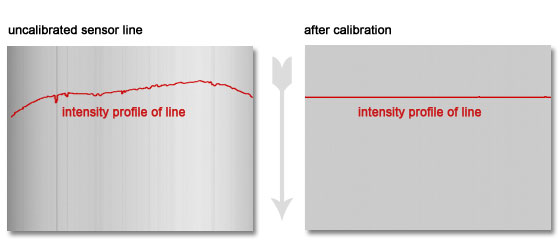
It is the aim of the calibration to generate an absolutely homogeneous grey image. Deviations from the ideal image result from many reasons:
- Mechanic position of camera and component
- Mechanic alignment of the lighting
- Sensor-related disturbances
- Lighting deviations along the line
- Spectral properties of light and sensor
- Distortion effects and vignetting of the optics
- Interfering influences of ambient light
Typical for these interferences is that the image has stripes, inhomogeneity or shading towards the margin, which can significantly affect an evaluation by means of machine vision software. Wrong mechanic positions and optical distortions further blur the image.
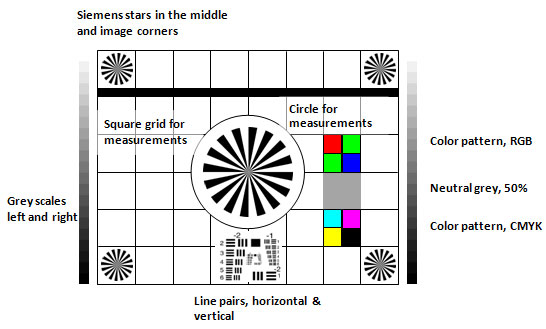
A calibration chart helps to determine these interferences and deviations, which fulfils many functions at the same time. Further details on (re)calibration:
 |
Before the development of a software application is started, the output image must be made PERFECT.
Creating an undistorted image
By means of the encoder settings and the corresponding multiplier / divisor settings on the line trigger input of the cameras, a distortion-free image must be generated first.
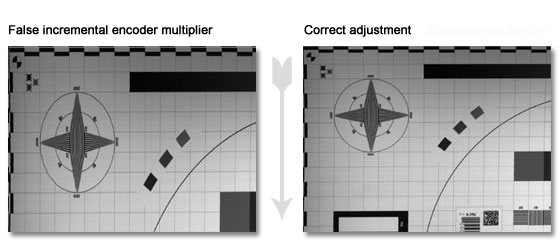 |
Please do not rely on your eyes, but measure, e.g. by means of a calibration grid, the form of circles or squares in X-direction and Y-direction. Only in this way you can be sure that you capture undistorted images of good quality.
Vertical lines and shading effects of the illumination
First of all make sure that the illumination exactly covers the captured image region. Tips for the alignment of the lighting can be found here.
If the image layout in X-direction and Y-direction is right and the image brightness more or less, the next step is the fine tuning. In the above image, too, larger brightness variations in X-direction are still recognisable.
In order to compensate this inhomogeneity, each renowned line scan camera manufacturer provides a ready-made software interface for the calibration of the camera.
The calibration is done in one or two steps:
- Dark image calibration: for this purpose the cap is shortly put onto the lens - done. In this way, different dark currents of the single pixels are determined and calibrated. Each unexposed pixel should provide the same black value after calibration.
- Particularly CMOS sensors show a grid-shaped brightness distribution in an extensive grey image which looks like a print raster over the actual image. In case of line scan cameras, this can be observed along the line and result in image stripes. This can be eliminated by calibration, too. (Of course, dirt on the sensor can result in the same stripes, too.)
- The bright image calibration serves to correct the light distribution of the illumination and the different photo-sensitivity of the pixels: for this purpose please set the image brightness to a value of 50 – 75 % on a homogeneous reference surface (paper), then focus the optics and calibrate.
(The calibration steps are referred to as PRNU, FPU, DNU: dark signal non-uniformity, fixed pattern noise, photo response non-uniformity.)
|
Any vertical image stripes should now have vanished and the image appears homogeneous. Then effect the fine tuning by means of the exposure time of the camera, the gain and the aperture of the lens and re-focus the optics.
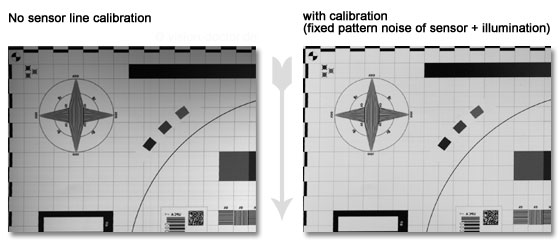 |
This calibration process served to compensate both sensor-related production differences and the brightness decrease on the margin of a line illumination (shading correction).
Horizontal stripes
Very rarely there are also horizontal stripes. They can have several reasons:
- Over-triggering of the camera due to too fast encoder signals (for details see "encoders")
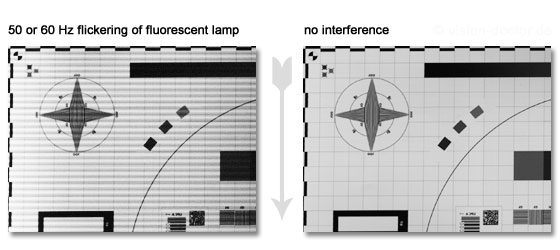
- Varying brightness due to influences of the overhead lighting (50-Hz flicker). The solution is stronger line illumination or the suppression of extraneous light influences by shielding, etc.
- Flickering due to unstabilised, badly filtered or under-dimensioned mains adapters of the lighting. The only solution is better hardware.
 |
Calibration of a colour line scan camera
Each colour camera, also line scan cameras, requires a white balancing in order to obtain neutral colours. Due to the colour temperature of the white light used (spectra of halogen lamps, LEDs, fluorescent lamps) the distribution of red, green and blue intensities in the camera image is not homogeneous. The different spectral sensitivity of the sensor for different wavelengths additionally intensifies this effect.
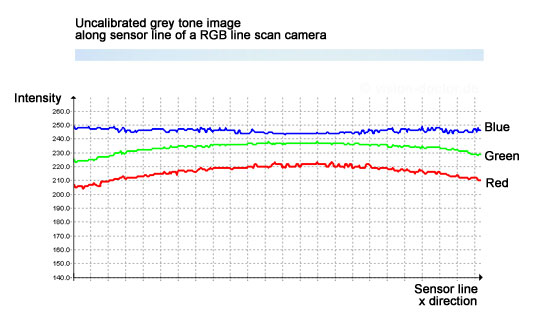 |
The image and path intensity diagram of a colour line scan camera shown here has two typical errors which must be calibrated:
- Shading towards the right and left image margin. It can be compensated by means of the bright image calibration, as with a monochrome camera.
- The image is not neutrally grey, but shows a blue and green cast (cyan). The amplification of the RGB channels must be selected in such a way that the three brightness curves in the above diagram are congruent. In case of three-chip colour cameras, this can partly be adjusted by means of varyingly long exposure times per sensor.
- Set the image brightness to a value of 50 - 75 % on a homogeneous reference surface (paper) again and defocus the optics for this purpose, then calibrate and re-focus the optics.


